Electrical Installation
Next up is electrical! This was probably the most daunting of all of the projects I did in the van. I have absolutely zero experience with electrical so this project took the longest.
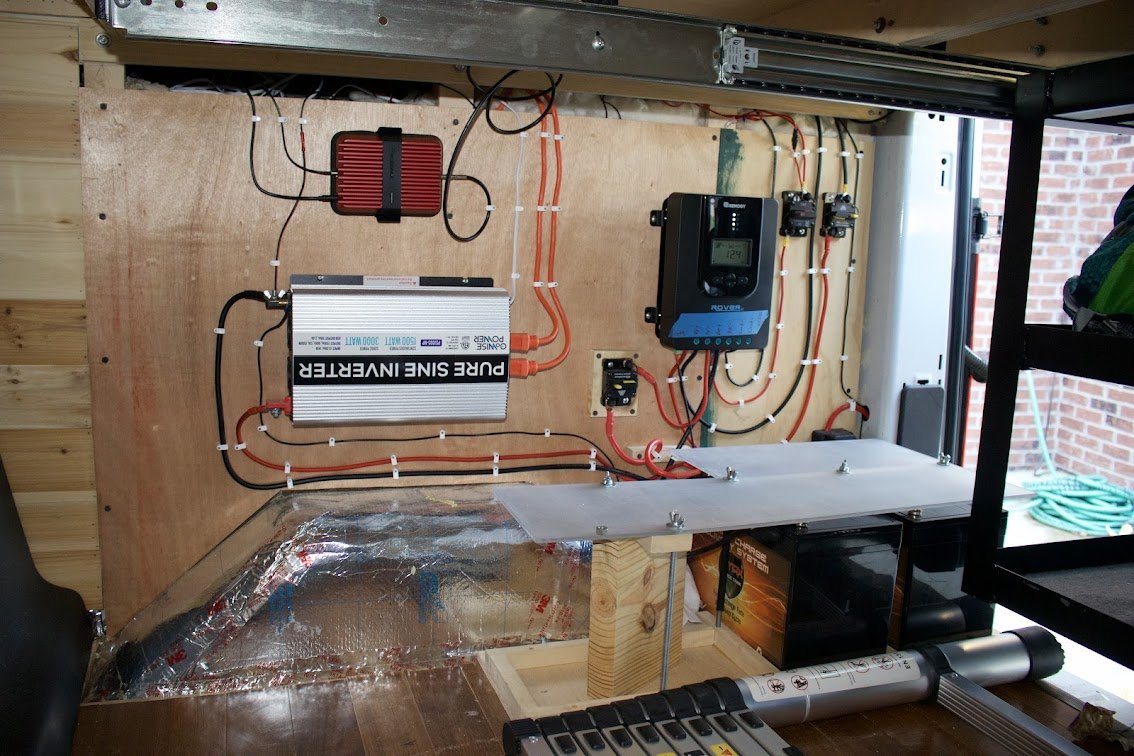
After a lot of research online, I found Stinson Vans ‘Campervan Electrical System Setup’. The diagram was easy enough to understand and accomplished what I wanted - getting power from the solar panels up on the roof and charging from the alternator when the van was running. The first task was figuring out how to lay out the batteries, inverter (what changes the power level to either 12v or 120v), solar power controller, and isolator. I also added a lot of fuses so that if something started to overheat or malfunction, the fuse would stop it from getting too far and affecting anything else. These can also be manually switched on and off when wanting to work on a specific area.
This process took a lot of wire - like a LOT. Way more than I thought. Just remembering you are wiring a home. I also had to decide exactly where each outlet would be and whether it would be a 12v or 120v so we could properly run power to each. I decided on two 120v outlets. One behind the drive seat to charge my computer (this is where I decided my work space would be in the layout of the design) and another near the kitchen (because duh we need power in the kitchen). The rest of the electrical in the van is 12v which uses less battery (conserving power coming down from the solar panels).
All of the 12v powered items (lights - indoor and outdoor, fan, toilet, etc.) run to a 12v multi switch panel. It is made for boats - many of the electrical items and other things in the build were originally developed for mariners. I didn’t realize how much I’d rely on boat construction to get all the elements of the van build right but if it works, then use it.
To keep all the wires straight I used painters tape to see which wires ran into the panel. It is much easier to use tape and label than to have to run your eyes down the wire to find the location.
My uncle also built a case for the batteries that is bolted into the floor and has a piece over top so that batteries are protected from any item that may fall and damage them or accidental bumps.
At this point, we also installed the backup camera and CarPlay screen. With such a large, tall van, I wanted to make sure I had eyes on the back of it to make sure I didn’t run into anything when backing it up. If you want to install a backup camera - do it at this point of the build because the wiring has to run from the front where the display is located to the backup lights on the back of the vehicle.
I also added in the WeBoost cellular signal booster. This involves mounting an antenna on top of the van that can swing up to increase the cell signal in an area (essential for working remotely), the controller is also mounted in the main electrical system set up and a small interior antenna is in the van. This is extremely useful in ares with little to no service.
Lastly, we ran wires from the van batteries (located under the front drivers seat of the van) to the batteries in the back. It made the most sense for my build to drill a hole in the bottom of the van and run the wire underneath and back up into the van in the back bumper. (Update: I have had a lottttt of work done on the van and this wiring has never been an issue for anyone working on the vehicle.)
The point of all of this is get your plan on the layout completely settled before you start wiring. You will have to get everything laid out and in the right place before insulating and creating your walls/ ceilings.
List of items I used in the electrical build:
Fire Extinguisher
CO2 and Smoke Detector for RV/ Boats
LED Panel Light DC 12V (4 pack x 3)
Recessed Ceiling Light
8 gauge red 35 ft power/ground wire
16 gauge red and black wire
18 gauge wire
30A waterproof fuse inline
40A waterproof fuse inline
25A waterproof fuse inline
Renogy 400 Watt Solar Panel Kit
VMAX Solar 110ah batteries (x 2)
1500 W Inverter Pure Sine Wave
RV Exterior LED Porch Utility Light (x 2)
8 gang rocker dual USB charger + digital voltmeter
Dual Battery Isolator Kit, 12V 140 Amp
Self Leveling Lap Sealant - 10.3 fluid ounces
12V Vent Fan (Fan-Tastic) Thermostat, Manual and Automatic speed Model 2250
12 Volt Water Pump
10 pack Wire Lugs 8 gauge
7" Touch Screen Wireless Carplay
Male to Female Backup Camera Extension Cable
Monitor Mount
We Boost - Cell Phone Booster Kit
See more photos of the electrical install process here.